📝 Note: This article focuses on Workpapers v2. All new Workpapers will display in this format. Previous Workpapers will remain in v1.
Quick Guide
- Generating Workpapers
- Menu Options
- The Approval Workflow
- Approving Documents
- Flagging Documents
- How it Works for Reviewers
- Workpaper Tools
📜 Generating Workpapers
Unlike previous iterations of Workpapers, we now automatically update the Workpapers based on actions taken in the Project (uploading new files, deleting files, etc.)
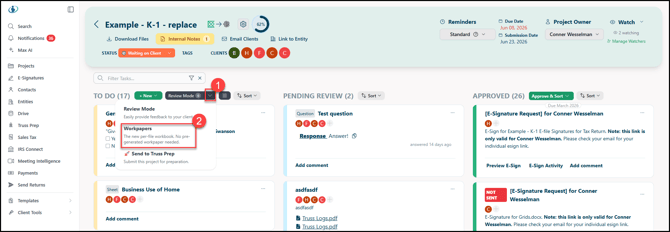
- Once you are ready, click the drop-down arrow next to Review Mode.
- Click Workpapers.
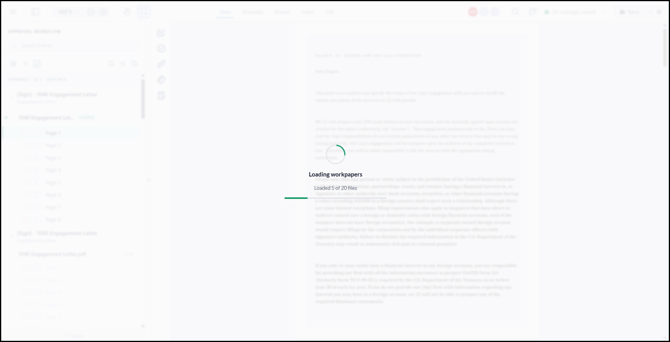
The Workpaper pane will appear and load all prior files and any new files that need to be added.
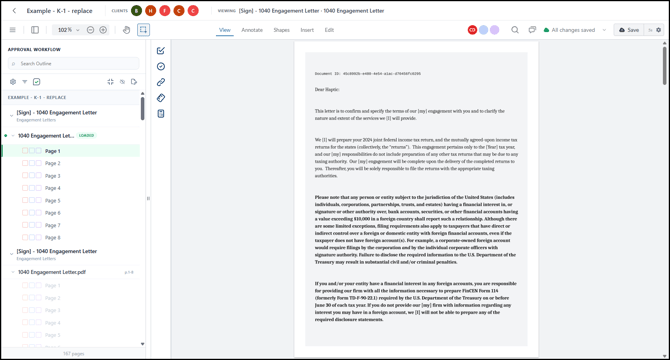
Once it loads and optimizes the files, you'll see your Workpaper workspace!
📝 Note: Previous errors caused by restricted PDFs (such as Merrill Lynch statements) have been resolved. These files should now process seamlessly.
💽 Menu Options
This is the Workpapers Menu. Click on this to expand the following options:
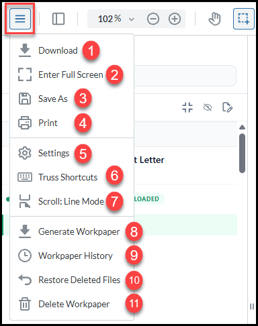
- Download - This allows you to download the current iteration of the Workpaper as a PDF document.
- Enter Full Screen - Enlarge the page similarly to pressing F11. Press Esc or click the X at the top to return.
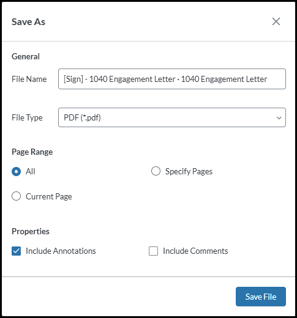
- Save As - Allows you to save the document, or specific pages, as a PDF or PNG file.
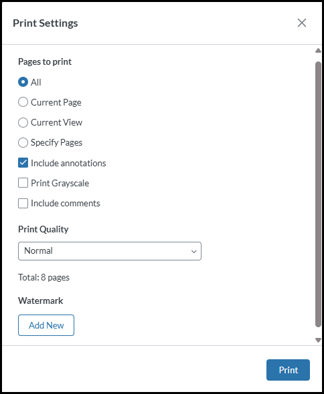
- Print - Print the current Workpaper to PDF. This option lets you print all pages, the current filtered view, or specified pages. You may also include annotations and comments, print to grayscale, and add a watermark.
- Settings - This hosts all of the configurable features of Workpapers. To learn more, visit our article on Workpaper Settings.
- Truss Shortcuts - Opens a full list of system shortcuts you can use while inside Workpapers. To see the full list, visit Workpapers Shortcuts (Hotkeys).
- This option shows your currently selected scroll method. You can click to toggle between Page and Line.
- Scrolling by Page means each scroll moves one page. Setting it to Line means each scroll moves line by line.
- Generate Workpaper - This option will render your work so far into a viewable PDF complete with bookmarking. You can review it here, then download it.
- Workpaper History - Displays a list of all major changes made. You can download specific prior items as needed.
- Restore Deleted Files - If you deleted files from the Workpaper during your Workpaper Editing, you can select to restore them here!
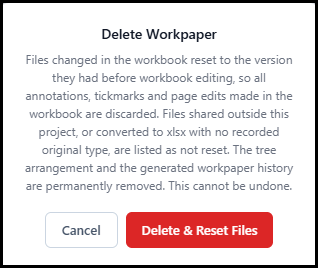
- Delete Workpaper - This will delete the current workpaper. A warning pop-up will appear detailing that all work will be lost. Click Delete & Reset Files to permanently delete the Workpaper.

🔢 The Approval Workflow
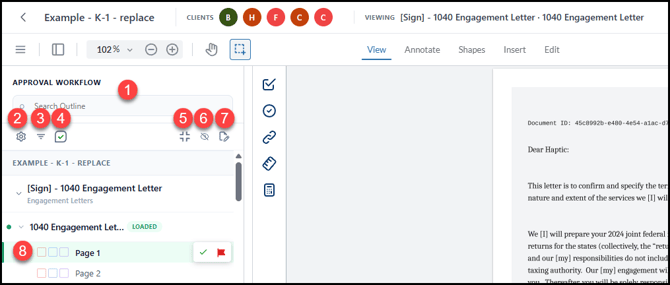
The bulk of your work comes from this main work pane and is where Workpapers will load by default.
- You can search your entire outline by file name to locate what you need to work on.
- You can sort your documents by Document Type or Tax Order.
- Besides just sorting, you can filter your documents by category to focus on specific items.
- You can also filter your documents by Approval Status.
- Collapse or Expand all of your documents.
- Show or Hide all of the pages underneath the documents.
- Edit your pages (rename, reorder). For full details on the Edit capabilities, visit our article on Workpaper Editing.
- Click the checkbox or, on hover, click the green checkmark to approve the page.
- On hover, you can also click the red flag to flag the page for review.
✅ Approving Documents
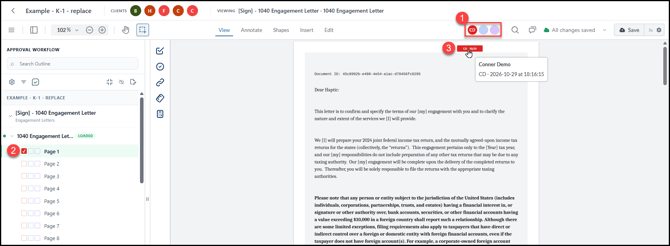
Our approval process is quick and easy! You can see who is set as a reviewer, which documents are marked as approved, and when!
- A user who approves a document will fill in these fields in the order they approve documents. Empty circles mean that a user in the order has not made any approvals yet.
- Once you approve a page, a check appears to the left of the page. The checks must always be in order (a second reviewer cannot mark a page as approved before the first box is checked).
- On the page, we create a timestamp for the approval. Hovering over the stamp provides the full date and time of the approval.
🚩 Flagging Documents
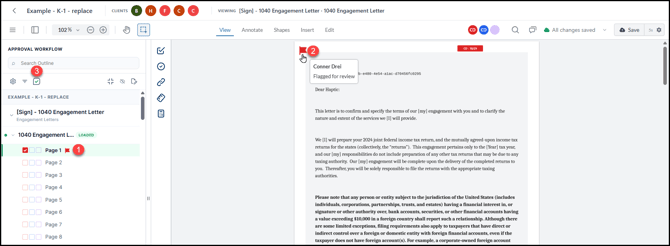
If a page needs a second look or you want to skip it and come back later, you can flag it directly in the work paper view. You can add or remove flags at any time, making it easy to coordinate between preparers and reviewers.
- Once a page is flagged for review, an icon is placed next to the page for visibility.
- An icon also appears on the page, marking it as needing review.
- You can filter your pages by flag. Select Flagged from the drop-down to see only pages that have been marked for review.
🔍 How It Works for Reviewers
Reviewers have the same tools. Each user can log in after the preparer, use their assigned color for tick marks, and mark documents independently—creating a clear, color-coded record of who reviewed what.
🛠️ Workpaper Tools
📝 Note: Many of the following features have expansive options and will be covered in their own separate article.
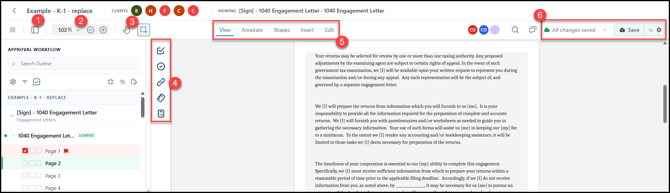
-
Show/Hide the side panel.
-
Page zoom settings.
-
Press the + and - to manually move the zoom, or click the drop-down next to the % to set a specific number, Fit to Width, Fit to Page, or Marquee Zoom!
-
-
Click the Pan hand to click and drag through the pages. Click the Select option to click and drag items on the page to select them.
- These are your main markup tools! In order:
- Approval Flow - The main workflow of Workpapers.
- Tickmarks - Add tickmarks to the document.
- Cross-References - Add links across pages for quick reference.
- Ruler - Add a visible ruler to the interface for measuring and straight lines.
- Calculator - Calculate totals and insert the results into the document.
- These additional tool tabs open a bar with more options.
- View - This is the default tab that just provides visibility.
- Annotate - Provides additional tools for marking up text.
- Shapes - Provides options for adding lines, boxes, circles, etc to a document.
- Insert - Attach signatures, files, and images to your workpaper.
- Edit - Crop pages and snip selections.
- Document Saving
- We mark if all changes are saved for visible confirmation.
- Click the drop-down arrow next to it to see the full save history for the Workpaper.
- Click Save to manually save the document.
- The Settings gear next to it allows you to set your autosave intervals.